RV Sewer Connections Explained
Four connections, from the trailer outlet to the hole in the ground. Once you can name them, the whole job stops being mysterious and becomes a sequence of quarter-turns.
Heads up: this page contains affiliate links. If you buy through one, Camp & Chock may earn a commission at no extra cost to you. It never changes which product we put first — how this site is funded.
There are only four connections between your holding tank and the campground sewer, and all of them are standardized. At the rig, a three-inch bayonet outlet with four lugs. At the hose ends, matching bayonet fittings that lock with a quarter-turn. At the campground, a four-inch sewer inlet that takes a 45 or 90 degree elbow, usually with a rubber donut seal. And for a permanent or home connection, a threaded adapter that joins the hose to PVC pipe. Everything sold in this category fits one of those four roles.
This is part of our sewer and water guide. Our hook-up walkthrough covers the procedure in order. This page is about the hardware itself: what each piece is called, what it mates to, and which ones you need to own rather than hope the campground provides.
Connection 1: the rig outlet
Behind the panel on the side of your trailer is a three-inch pipe stub with four lugs cast into the outside, and a cap over the end. That stub is the bayonet outlet, and it is the same on essentially every towable RV sold in the United States. The four lugs are what the hose fitting twists onto.
Two things about it matter. First, the cap is not a valve — the valve is the blade handle inside, and the cap is only there to catch drips. Never assume a closed cap means a closed valve. Second, the lugs can be chipped by a dragged hose or a careless connection, and a damaged lug is the usual reason a fitting will not lock.
Connection 2: the hose ends
A hose kit comes with a fitting at each end. The rig end is a swivel bayonet fitting that drops over the outlet and twists a quarter turn until the lugs seat. The swivel matters: without it the whole hose has to rotate to make the connection, which is both awkward and the reason people under-tighten.
Hose sections join to each other with the same bayonet standard, which is why a 10-foot section from one brand generally mates to a 10-foot section from another. It is also why you can carry one 10-foot section for normal sites and add the second only when the inlet is far away.
Connection 3: the campground inlet
The sewer inlet at a site is a four-inch pipe, usually with a threaded cap, set flush or slightly above grade. Your hose does not connect to it directly. It connects through an elbow — a 45 or 90 degree adapter that turns the hose downward into the inlet, and holds the hose end at an angle where it drains rather than ponds.
A clear elbow is worth buying over an opaque one for one reason: it is the only way to see when the flow runs clear, which is the only reliable way to know a black tank is actually empty rather than probably empty.
Many parks require a sealed connection, meaning the elbow has to sit in a rubber donut seal rather than resting loose in the pipe. The seal costs very little, takes no space, and you generally find out it is required after you have already set up.
The hardware this page describes
A complete kit covers connections one and two. The clear elbow and the donut seal cover connection three, and the gloves live in the same compartment.
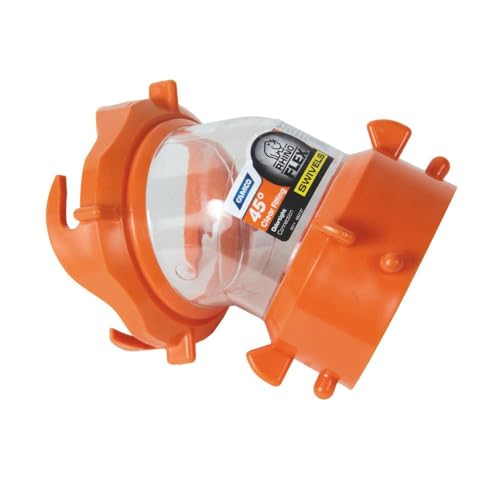
Best for Seeing when the tank is done
Camco RhinoFLEX Clear 45-Degree Sewer Adapter
The clear elbow: the cheapest way to know a black tank is genuinely empty rather than probably empty.
Best for Parks that require a sealed connection
Camco Rhino Sewer Hose Seal Donut
A rubber donut that seals the hose into the park's sewer inlet. Many parks require one, and most people find that out on arrival.
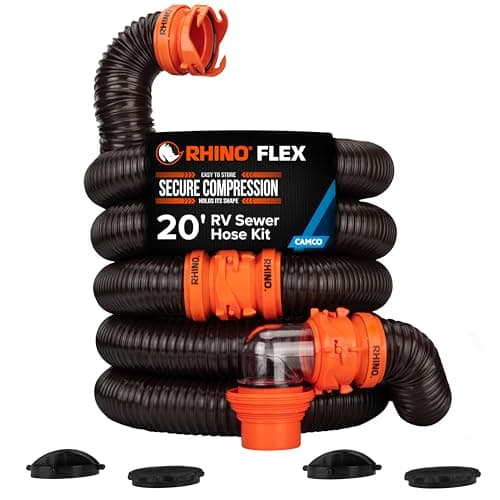
Best for The first sewer hose to own
Camco RhinoFLEX 20-Ft Sewer Hose Kit
The complete first kit: 20 ft in two sections, both fittings, and a clear elbow so you can see when the tank is actually done.
Best for The obvious thing nobody packs
Heavy-Gauge Disposable Nitrile Gloves (box)
Keep a box in the sewer compartment itself. The gloves that live inside the trailer are the gloves you do not use.
Connection 4: the threaded adapter, for PVC and home use
This is the connection most people search for and the one no kit includes. If you are connecting to a permanent sewer line, a septic cleanout, or a PVC stub at home, you need an adapter with a bayonet fitting on one side and a pipe thread on the other.
The threaded side is a three-inch pipe thread, and it screws into a standard three-inch PVC female adapter — which is itself glued to whatever pipe size your line actually is. If your line is four-inch, you use a four-inch to three-inch PVC reducer bushing between them. None of this is RV-specific plumbing: once you are past the bayonet adapter you are in ordinary hardware-store territory.
The four connections and what mates to what
| Connection | At the rig / site | What mates to it |
|---|---|---|
| 1. Rig outlet | 3 in bayonet stub, four lugs | Swivel bayonet fitting on the hose |
| 2. Hose to hose | Bayonet, both ends | Any standard bayonet section, any brand |
| 3. Campground inlet | 4 in sewer pipe, threaded cap | 45 or 90 degree elbow, ideally with a donut seal |
| 4. PVC or home line | 3 in pipe thread | Threaded bayonet adapter, then a PVC female adapter |
What to keep in the compartment
A complete sewer kit, the clear elbow, a donut seal, a box of heavy gloves, and a short length of spare hose if you have the room. That covers every site we have seen. Add the threaded PVC adapter only if you will actually use a permanent connection — it is cheap, but it is also the piece most likely to sit in a compartment for three years.
For which hose and which length, see what size RV sewer hose you need — the short version is that the diameter is three inches on essentially every towable rig, so the only real decision is length. Where to put all of it afterwards is covered in sewer hose storage ideas.
Two connections people do not expect to need
A hose-to-hose coupler. If you own two separate sections rather than a kit that came sectioned, the two male bayonet ends will not join to each other. Sectioned kits include the coupler that solves this; two single hoses bought separately generally do not, and it is the item most often missing at a site where the inlet turned out to be further away than expected.
A gate valve at the rig end. This is a short bayonet fitting with its own blade valve, installed between the trailer outlet and the hose. It gives you a second barrier so you can disconnect the hose without relying on the tank valve having sealed perfectly, which on an older trailer is a genuinely useful assumption to avoid making. It is not standard equipment and it is not expensive.
Connection four is the one people are usually researching for a specific reason: the trailer lives at the house. Connecting an RV to a home sewer covers where that connection goes, what to check before you buy a fitting, and why fall matters more than hardware.
Questions people actually ask
What size is an RV sewer connection?
The outlet on the rig is a three-inch bayonet fitting with four lugs, standard on essentially every towable RV sold in the United States. The campground inlet is a four-inch pipe, which your hose meets through an elbow rather than directly.
How do I connect an RV sewer hose to PVC?
With a threaded bayonet adapter: bayonet on one side for the hose, three-inch pipe thread on the other. That screws into a standard three-inch PVC female adapter, and if your line is four-inch you add a four-to-three reducer bushing.
Do I need a sewer donut seal?
Many parks require one, and it costs very little. The donut sits in the inlet so the elbow seals into the pipe instead of resting loose in it. Keep one in the compartment rather than finding out it is required after you have set up.
Is the cap on the RV sewer outlet a valve?
No. The cap only catches drips. The valve is the blade handle behind the panel, and a closed cap tells you nothing about whether the valve is closed. Treat the cap as a dust cover and check the handle.
Are RV sewer hose fittings universal?
Within the bayonet standard, effectively yes. Hose sections and fittings from different brands generally mate, which is why you can extend a kit with a single section from whatever is stocked locally.
Why use a clear elbow instead of a solid one?
Because you can see when the flow runs clear, which is the only reliable way to know the black tank has finished emptying rather than just slowed down.
Sources
Read next
Sewer & Water
How to Hook Up an RV Sewer Hose (Step by Step)
The full sewer connection and dumping sequence, in order, with the two checks that prevent the story you tell for years.
Sewer & Water
What Size RV Sewer Hose Do I Need?
Sewer hose length and diameter settled, with a table matching site layouts to the length you will actually need.
Sewer & Water
Best RV Sewer Hose for a First Travel Trailer
Complete sewer hose kits compared on length, wall thickness, fittings and storage, for someone doing this for the first time.
Sewer & Water
RV Sewer Hose Storage Ideas
Where to actually store a sewer hose, why the bumper usually will not work, and the separation rule that matters.
Reviewed October 10, 2026. Spot something out of date? Tell us and we will fix it.